Wednesday, November 10, 2021

Sewing Terms & Definitions IV-Final Series


Welcome to the final post discussing definitions of sewing terms. If you missed any part of the Sewing Terms and Definition Series, you can catch them here

Today we will be reviewing pattern notches, pressing, pressing cloth, remnants, seam allowances, seam layering, selvage, tailor’s tacking, and under-stitching.

PATTERN NOTCHES: triangular markings on the pattern edges that are used to match up fronts to backs, collars to necklines, and waistbands to waist edge, etc. Cut out around notches rather than into the seam allowances to prevent unnecessary fraying. Follow the guidelines and cut double or single notches as shown as these will help with matching pieces together accurately.


PRESSING: this differs from ironing in that you do not glide the iron back and forth; instead, the iron is lowered onto the fabric, held for 30 seconds, lifted, and lowered again. This technique prevents a shine from coming onto your fabric and it helps to keep the fabric fibers from being distorted. Press seams from the wrong side of the fabric. Only press from the right side when the fabric is protected by a pressing cloth. (No photo included since we all know what an iron looks like! :))


PRESSING CLOTH: a cloth that is used to protect the main fabric from the iron; an organza piece of fabric is a very good pressing cloth because it withstands a hot iron and it’s transparent so you can see what you are pressing. A 100% cotton fabric like muslin is also a good option to use as a pressing cloth. Either choice is a great option to help prevent a shine or an accidental burning on your garment or project.


REMNANTS: are usually discounted small pieces of fabric, generally about a little over a yard (36 inches or more) or smaller off cuts of fabric. Remnants are a great way to experiment sewing with different types of fabrics.

Remnants I just purchased

Remnants I just purchased


SEAM ALLOWANCES: the fabric between the stitching line and the raw edge of the fabric. This is used to prevent the seams splitting open as the fabric is pulled and stressed to be worn. The seam allowance for home sewing patterns is generally 5/8 of an inch (unless otherwise indicated on the pattern); in the fashion industry the universal standard is 1/2 of an inch (unless otherwise indicated).


SEAM LAYERING: when sewing three pieces of fabric together within a seam allowance, trim all seams in layers creating short to long seams (see photo example). This reduces bulk within the seams and allows the seam to lie flat when pressed; also referred to as “grading”.


SELVAGE:  refers to the edge of fabric as it comes off the bolt. The selvage is the machine finished edges of the fabric which has manufacturer information. This area of the fabric is usually a bound edge that does not fray. The selvage of the fabric may also have color dots which show the colors used in the fabric and lines to indicate the repeat of a print. Special Tip: if you have a fabric that is hard to tell the right side of the fabric, look on the selvage, you will notice small holes, if they are pointed upright, that’s the right side of the fabric since the fabric is printed, woven, or constructed, on the right side.


TAILOR’S TACK: is to sew a few stitches in one spot, either by hand or by machine stitching, to secure one item to another.
example of tailors tacking


UNDER-STITCHING: assists a facing or lining to stay to the inside and unseen within a garment. It is stitching that is sewn as close to the seam line as possible holding the seam allowance to the facing or lining.


This concludes our Terms & Definitions Series; I hope you enjoyed. If there are any definitions, you’d like me to review, I would be delighted to review those for you also. If you have any questions or comments, please leave them below. Have a wonderful day!

Until next time!

Wednesday, October 27, 2021

Sewing Terms & Definitions-Series III

As mentioned in my previous posts, whenever I have a sewing class or private sewing lesson, I provide my students with a Treasured Guidelines folder. one of the most important pieces of information included in that folder is, Sewing Terms and Definitions.

Treasured Guidelines Folder


Today we will be going over Part III in this series, if you missed Part I & Part II; you can read about that here. Today, we will be going over the definitions of pattern Grainlines, Ham (Tailor's Ham), Hems, Interfacing, Interlining, fabrics with Nap/without Nap, and Notions. We will cover these seven definitions along with example photos.

GRAINLINES: the grainline is printed on the tissue pattern pieces as a straight line with arrowheads on either end. This line MUST be parallel to the selvage of the fabric so that the piece will be cut with the grain of the fabric. Some grainlines are angled toward one edge of the pattern piece are to be placed on the fold of the fabric, sometimes labeled "Place on the Fold"; you must ensure the fabric is folded with selvages parallel so that the straight-grain of fabric is still true. This ensures your finished garment will hang properly.

In the example photos, this is a copy of one of my patterns I made for my basic boxer shorts pattern. I label it with as much information to remind me how to lay the fabric out to get the best results. In the following photo, if the pattern markings are not showing on the pattern paper, most manufacturers will have that information and helpful definitions listed in the instruction sheets.


HAM: also referred to as a Tailors' Ham, this pressing ham is literally a firmly stuffed ham shape with curved edges. It is useful for pressing curved seams like princess seams and darts. Similarly and pictured below, (honorable mention) a Sleeve Roll is used to press sleeves cuffs without leaving creases. Both serve the same purpose, however the sleeve roll makes it easier to fit inside a cuff. Generally, the plaid side of both the ham and the sleeve roll is used for woolens, synthetic blends and other fabrics requiring low to medium pressing temperatures. The cotton side of the ham and seam rolls is used for cottons, linens, and other fabrics requiring medium to high temperatures when pressing.

Tailor's ham from the top

Tailor's ham from the side


HEM: is a turned under edge, to the inside of a sewn item, made by folding edge of the sewn item to the inside of the item. Hems affects the way something will hang and sometimes hem weights are used to assist in gaining the desired appearance. The amount of hem depends on the item, the weight of the fabric and the amount of fabric available to turn under.

In the example photos, I have created three types of hems (I used contrasting thread & colors to make it easier to see). From the top to bottom: the top sample is a hem usually used on skirts, slacks, etc. with blind-hand stitching to make it hard to see on the outside of the fabric. The second example is a narrow rolled hem, whereas the machine stitching is visible from the outside of the hem. The last example is hemmed by turning the fabric under twice the desired length and machine stitched to secure the hem in place. The other photo shows what each hem looks like if it were on the outside of the garment.

Hem samples inside the garment

Hem samples outside the garment


INTERFACING: a layer of fabric or specialty fabric that is put between fabric layers to add support, strength, and stability at waistbands, collars, cuffs, facings, etc. Use interfacing that corresponds with the main weight of the fabric for example, use lightweight interfacing for lightweight fabrics and use heavyweight interfacing for heavyweight fabrics. There are many varieties of types of weights of interfacing, but fusible and sew-in are the two applications used most often. If using fusible interfacing, PRESS, do not iron; place hot iron on the interfaced piece, hold for 10 seconds, lift and reposition. Allow to cool completely before stitching.

INTERLINING: is also a layer of fabric or specialty fabric used between the outer fabric and the lining of a garment, not interfacing. This layer is referred to as interlining because it too provides support inside a garment for structure. Typically, the interlining is used to add extra structure to garment pieces requiring additional support such as bonded-bodices in corsets or bustier, wedding gowns, tailored suit jackets, etc. Interlining and interfacing are often used to mean the same thing, although they function the same way, they don't mean the same thing.

photo of fusible interfacing


Photo of inside of book listing different interfacings
Photo from a page inside: Singer Sewing Reference Library-Sewing Essentials Book-Copyright 1984

NAP/without NAP: a fabric with a nap is one that usually has a pile and will look different shades with different angles. Velvet or velour fabrics are prime examples of fabrics with naps. When cutting on fabrics with NAP it is important to remember to follow the grainline of your patterns whereas all your pattern pieces are going in the same direction; this ensures your fabric will look the same color when sewn together.  Please note, fabric with directional or one-way designs are also considered "with nap" so use the cutting layout for same direction patterns; also in some cases, if not most, you will need more fabric than recommend on the pattern envelope. When laying out patterns on fabric without NAP, it's business as usual, just follow the layout/grainline of your fabric as normal.


NOTIONS: notions are all the small tools used in sewing to aid in working/finishing a sewing project. Sewing notions include (but not limited to) items like needles, thread, pins, fabric marking pens, chalk, elastics, seam rippers, zippers, buttons, etc.

In the example photos, I have all the notions a beginner sewing student would need in our Treasured Tool Kit (Shameless plug for my teaching business!). I have only a few available, if you'd like to purchase one for yourself, send me an email.

Treasured Sewing Tool Kit

Sewing Treasures Tool Kit

Sewing Treasures Tool Kit


This concludes today's post. In our fourth and final series, we will define Pattern Notches, Pressing vs Ironing, Pressing Cloth, Remnants, Seam Allowances, and Seam Layering.

I hope you found this information helpful. If you have some definitions you'd like me to review, feel free to leave a comment.

Until next time!

Sunday, October 17, 2021

Sewing Terms & Definitions- Series II

Whenever I have a sewing class or private lessons, I provide my students with a Treasured Guidelines folder. One of the most important pieces of information included in that folder is, Sewing Terms and Definitions.

Today we will be going over part II in this series, if you missed part I, you can read about that here. Before, we dive in; I mentioned in the previous post, that we were defining the following: clipping & notching, ease, facing, finishing seams, and fraying. We will define those; however, I forgot to include DARTS and FUSE/FUSIBLE…I don’t know what I was thinking, but I will include them in the post today and put them in alphabetical order! So, instead of 5 definitions in this post, we will cover 7 definitions. So please forgive me for that oversight, and let’s get started.

CLIPPING/NOTCHING: seam allowances are clipped and notched at the curved areas, so that when they are turned through they will lay flat. Clip inner curves by snipping up to, not through stitching, with diagonal snips. Notch outer curves by taking little wedge shaped cuts form the seam allowances.

In the example photos, the outer curved seam is clipped in wedge shaped cuts and when it’s turned right side out and pressed, that curved seam is flat.


DARTS: these are used to shape garments to the contours of the body. Darts are usually at the bust, hips, shoulder line or elbows to allow fabric to fit the contours of the body. The point of the darts should always point to the fullest part of the body. There are two types of darts, a single-point dart and a two-point dart. The single-point dart is wide at one end and point at the other end. The two-point dart has points at both ends and is wide in the center of the dart.

In the example photos, I show you the single-point dart before it is sewn and after it is sewn. The next photo is the two-point dart before and after it is sewn.


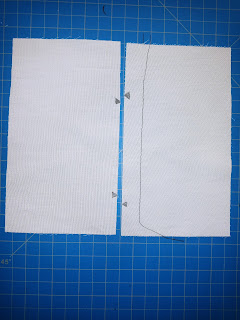
EASE/EASING: is to draw the fiber of fabric closer together than they were woven or originally manufactured. This is usually achieved with machine basting. When easing in fabric, no tuck or gathers are made in the fabric. Easing in the fabric allows a curved capped sleeve to fit in to the straight line of a jacket armscye to which the sleeve is sewn.

In the example photos, you’ll see the fabric with the black notches need to fit between the notches of the fabric on the right. When a machine basting line is stitched to ease to fit within those black notches, then it can be sewn slowly and careful to prevent puckers. Once it’s ironed properly, you can see there are no puckers.

Easing example on muslin

Easing fabric after being sewn

eased fabric after eased

Eased fabric after being pressed

FACING: a facing is the area of a garment or sewn item that turns to the inside, giving the finished appearance to what would otherwise just be a raw edge of fabric. The facing is usually interfaced to add shape and structure to the inside of the garment or sewn item.

In the example photos, you can see where the section of the half collar with the clothing label (shameless plug for my design business J) is a little more firm that the other layer of fabric that is because it was interfaced to add structure with in the collar.

Collar with Lenique's clothing tag


FINISHING SEAMS: used on most woven fabrics, finish seams by using pinking shears, overlock/serge, overcast with a zig-zag stitch, turn fabric edges under, straight stitch, or cover the edge with seam/bias binding.

In the example photos, I show you an overlocked or Serge seam with a Serger sewing machine. The next example is a seam cut with pinking shears, and the final example is done using a zig-zag stitch with the sewing machine. 

examples of finished seams

FRAYING: this happens to most woven fabrics when fibers become unwoven or unravel typically through handling while sewing or laundering. Woven fabrics will fray while wearing or washing which can cause the garment to come apart if the seams are not finished properly.

In the example photos, I show two pieces of fabric, the green fabric is flannel back satin and the fibers are fraying. The other fabric is 100% cotton muslin and if you look closer, you will see that fabric fraying as well. Finishing seams (as mentioned above) is used to prevent fraying or unraveling of woven fabrics.


FUSE/FUSIBLE: refers to using the fusible material, which melts to “glue” two layers together. This melting action is done with a hot iron (no steam). In order for the fusing to work, the fabrics must be pre-washed or preshrunk to remove manufacturers’ finishes. These finishes will prevent a good fuse from occurring. Fusible web is available in a variety of weights and sizes.

In the example photos, the first one is a picture of fusible interfacing showing the right side and the fusible side; if you could feel the fusible side it has raised dots with a slight sheen to indicate it’s the fusible glue, this is the side that is placed to the wrong side of the fabric. The next photo show fabric with and without fusible interfacing and shows how much structure it gives to the fabric.

picture of fusible interfacing right and wrong side


This concludes today’s post. Next time, we will define Grainline, Ham (Tailor’s Ham), Hems, Interfacing, Interlining, Nap/without Nap, and Notions. We will cover these seven definitions along with example photos.

I hope you found this helpful! If you have some definitions you’d like me to review, feel free to leave a comment.

Until next time!


Friday, October 8, 2021

Sewing Terms & Definitions- Series

Whenever I have a sewing class or private sewing lessons, I provide my students with the "Treasured Guidelines" folder.

Front cover of TG folder for students

Inside TG folder for students


I named it the "Treasured Guidelines" folder because I have researched and compiled, what I think is the most helpful information needed when learning sewing as a new skill. While it is not as comprehensive as it could be, it has all the necessary information to get anyone started.

TG Folder for students

One of the most important pieces of information that I cover during the first session of class, which is our introductory session, is sewing terms and their definitions. Since most, if not all, professions have their own set of language and/or terms; don't discount sewing, because we also have our own set of terms/language that only we can understand. It is helpful to know what these terms mean, so beginners in the sewing industry can understand the instructions in the pattern envelope, the sewing teacher, or even YouTube videos on sewing.

For the consideration of time, I will cover about 5 terms and definitions per blog post...this is the first of a series of more to come, let's get started:

Alterations: any changes made to a pattern or finished garment. Examples: Tailoring a suit to fit, hemming pants, a skirt, or dress, etc

Applique: a term used to describe attaching a small piece of fabric to create a desired design. It is usually done to add a form of fabric artwork. The smaller piece of fabric may be attached by using hand or machine stitching. In the photo, the lace applique is considered the applique piece that I added to the wedding dress sample that I made through Lenique's Originals, LLC, my design business.

lace applique

applique on wedding dress

Appilque Picture

Back-stitching: is sewing in reverse and then forward over the same stitches to lock the beginning and the end of the sewn seam. It prevents the stitching from coming un-sewn. In the following photo I stitched an example, when you press that button on your sewing machine, this is sewing in reverse to lock your stitches.

Reverse button on my sewing machine

reverse stitch on the machine

Basting/Tacking:
large straight running stitches used to temporarily hold fabric layers together. Basting or tacking can be done by hand or machine stitching; use contrasting thread so the stitch can be removed easily; use the largest stitch possible on the sewing machine. 

In the following photo, please don't be too critical of my hand-stitching skills, I know it's super crooked, and that was done on the second try, ugh! But, I'm sure you get the ideal!

Picture of basting stitches

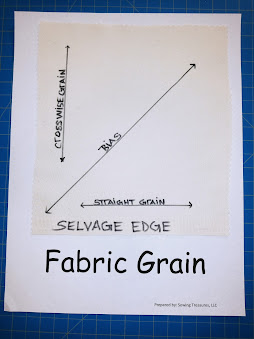
Bias: is the most stretchable part of woven fabric, which is 45 degrees to the straight grain of woven fabric. Fabrics cut on the bias drape and flow nicely. There are special instructions you will need to know when working with bias cut garment pieces, if enough people request it, I will write a separate post. 

In the photo, I show you a sample of the elements of woven fabric and what happens when you stretch the fabric on the 45 degree angle.
Fabric grain bias

me stretching the bias of grain

stretching the bias again

This concludes today's post. Next time, we will define clipping/notching, ease, facing, finishing seams, and fraying. I am going in the order of the alphabet, just in case you didn't notice 😁.

If you have any definitions or suggestion, please leave me a comment! Until next time!